Haunted Dorm Beginner's Guide: Best Room, Bed and Door Order
A first-run route for Haunted Dorm: how the bed-door loop works, which room to pick, when to build turrets, and the three mistakes that end most runs.
Haunted Dorm looks like a horror game and plays like an economy game. You are not trying to fight the Dream Hunter in the first minute. You are trying to make your bed earn coins faster than the hunter can break your door. Everything else — turrets, repair stations, the arcade machine — exists to buy that economy more time.
This guide covers the first successful run on the normal map. It assumes the current iOS build (2.5.x) and the Steam version, which share the same room-defense loop. Hell mode and the Dream Hunter mode are separate guides.
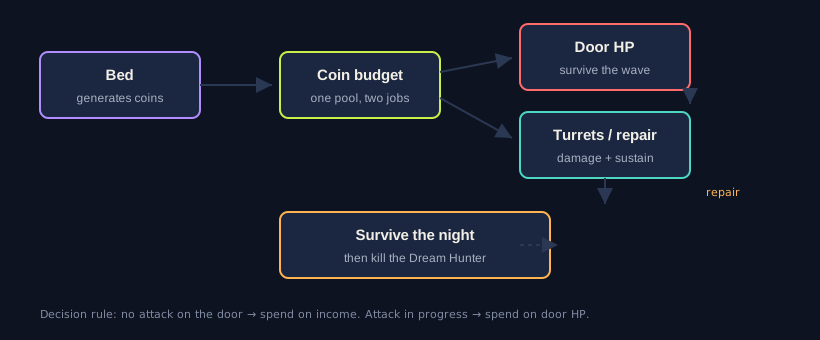
The loop in one paragraph
Pick a room. Lie on the bed. The bed generates coins while you sleep. Spend those coins on two things: a better bed (more income) and a stronger door (more health). Build support objects when you have spare power and coins. The hunter arrives in waves, attacks the door, and eventually the room. If the door breaks and you are caught, the run ends. If you survive long enough and deal enough damage, the hunter dies and you win.
The tension is that bed and door compete for the same coins. Spending everything on the bed gives you a huge income and a paper door. Spending everything on the door gives you a fortress with no income to maintain it.
Pick a room next to other players
Room choice is the first decision and the one most players rush.
- Prefer a room with AI neighbors on at least one side. The hunter switches targets, and nearby rooms absorb part of that pressure. An isolated room gets the full wave.
- Avoid opening with a turret. A turret makes noise and reveals where you are. Build one when you can actually kill something with it, not on the first night.
- Treat the bed as the win condition, not the door. The door is a timer. The bed is the engine.
If you cannot get a neighbor-adjacent room, the run is still winnable, but you need to delay the first turret and put more coins into the door earlier.
The upgrade order that works
Use this as a default and adjust only when the hunter is already at your door.
- Bed to the first meaningful income step. Do not dump every coin into the bed at once; upgrade until the next bed level costs more than you can safely spend before the first wave.
- Door to survive the first wave. The door only needs to outlast the wave, not the whole run.
- Bed again. Income compounds; door health does not.
- One damage source. A turret or a trap, placed so it covers the door approach rather than the middle of the room.
- Repair station. Once repairs cost less than a door level, repair becomes part of the loop instead of an emergency.
The practical rule: if the hunter is not currently attacking, spend on income. If it is attacking, spend on the door. Do not split coins evenly "to be safe" — that produces the worst of both.
Support objects: what they are actually for
The room has more objects than a beginner needs. Build them in this order of usefulness:
- Repair station — turns coins into door health between waves. This is the object that makes long runs possible.
- Fridge / food object — supports sustained income and recovery. Build it when your bed is already stable.
- Arcade machine — power and utility. It is a mid-run object, not a first-minute object.
- Extra turrets — only after you have something that can repair the door. Turrets without repair just die one wave later.
Power is the hidden constraint. Every object draws it, and the room's power capacity is limited. If you build three turrets and no power source, you will not be able to upgrade the objects that matter.
Your first-night checklist
- [ ] Room has at least one AI neighbor.
- [ ] Bed upgraded at least once before the first wave.
- [ ] Door upgraded enough to survive the first wave.
- [ ] No turret built before you have income to replace it.
- [ ] One repair option identified (station built or coins reserved).
- [ ] You know which side the hunter approaches from, and you are not standing in the open.
If you finish the first night with a stable bed, a door that survived, and coins left over, the run is on track. If you finish with a strong door and a level-one bed, you are already losing the economy race.
The three mistakes that end most runs
1. Building turrets too early. Turrets reveal your room and cost coins that should be compounding in the bed. A turret that kills nothing is a slower bed.
2. Repairing the door but never upgrading the bed. Repairing a weak door forever is a slow loss. The door exists to protect the bed, not the other way around.
3. Fighting the hunter in the open. The room is the cover. Leaving cover to chase damage usually means your door breaks behind you.
What about codes and purchases?
Haunted Dorm has no verified redemption-code system. Third-party “code” lists for this game are not supported by an official redemption page, so this site does not print them. On iOS the game is ad-supported with no in-app purchases; the Steam version is a paid client. There is no account-wide currency shop that changes the room-defense loop.
FAQ
Is Haunted Dorm pay to win?
No. The iOS build has no in-app purchases and uses ads for extra rewards. The Steam version is a one-time purchase. Progress comes from learning the bed-door economy, not from spending.
Which room is best in Haunted Dorm?
A room with AI neighbors, because they absorb part of the hunter's attention. There is no single magic room number across maps; the shape of the corridor and the number of adjacent rooms matter more than the label.
Should I upgrade the bed or the door first?
Bed first, then door to survive the current wave, then bed again. If the hunter is already hitting the door, switch to the door immediately and return to the bed after the wave.
Does Haunted Dorm have codes?
No verified official redemption system exists. Do not trust lists that promise free coins for a code you cannot enter in-game.
How this page was checked
Written for Mini Game Guides and last verified on Oct 23, 2026. Store names, release dates and platform availability were checked against the official listing; gameplay advice is based on the mechanics described on that listing and the sources below. If a code or a reward is not confirmed, it is not printed.
Spotted something outdated? Tell us with the page URL and what changed.